In the last article, I explained what AI Agents are and what they are used for. In this article, I will show you an example of an AI Agent that is not very specific but can help you understand the concept. We will focus on the general structure and concepts.
This is the visual representation of the AI Agent we will discuss.

n8n as a powerful AI Agent tool
The most widely used tool to implement AI Agents is n8n. It allows you to drag and drop nodes that perform different tasks and connect them. That is how you set up the AI Agent to assist you in your daily tasks. Adding different nodes and connecting them the right way gives your assistant its unique set of features, capabilities, and personality.
In n8n, you can not only position and connect functional nodes, but you can also use colored rectangles and text. This can be used to designate sections of the node tree so that it is easier to read and extend later. Next, I will go through all the different sections of my Agent and explain what the sections are used for and what the nodes inside mean. After reading this article, you could start using n8n and try to recreate a simple AI Agent, too.
1. Get chatInput
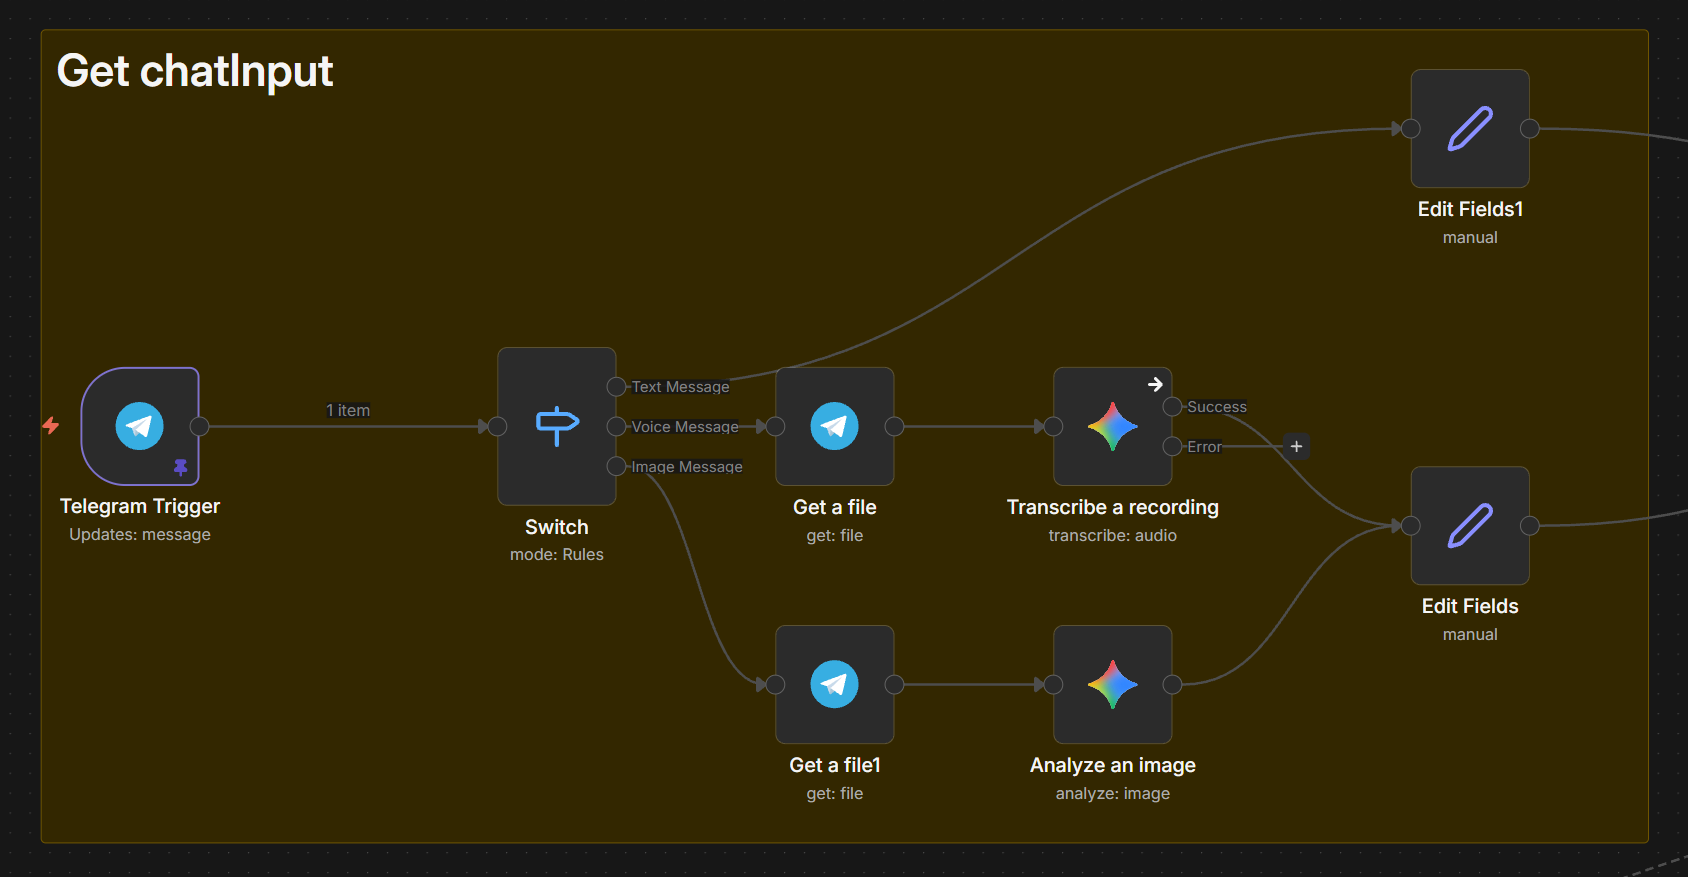
In order to communicate with our assistant, we need to connect it to a chat service. For my assistant, I chose Telegram because it is the easiest to set up. You need to create a Telegram Bot inside your Telegram application and use the API Key to connect the newly created bot to your AI Agent. One by one, we will go through the different nodes in the image.
- Telegram Trigger This node handles the communication between your n8n instance and your Telegram Bot. The node is a trigger node, which means it listens for an event and triggers the AI Agent to act. Whenever a person writes to your Telegram Bot, the node is triggered, initiating the inner logic of the Agent that will later result in an answer for the user. In case you are building a personal assistant and do not want others to use it, you can configure the node so that it only answers to your user and no one else.
- Switch
If you are familiar with coding, this is just a simple switch statement. Or, to make it easier to understand, they are just multiple “if” statements in one node. In the node, you can define cases; whenever a case is fulfilled, the corresponding path is taken. In this case, I created three different statements.
- Case 1: Text Message
If the message that the user sent is a text message, then this path is taken.
- Edit Fields This node stores the text message received in a variable so that it can be reused later by different nodes.
- Case 2: Voice Message
If the user has sent a voice message, this path is used instead.
- Get a file When using the Telegram Trigger and the user has sent files (which include voice messages), you need to explicitly retrieve the files. This node retrieves the voice message as an audio file.
- Transcribe a recording This is our first node that uses an AI model. For this Agent, I used only Google’s Gemini Model. This is because whenever you use an AI Model, you need to connect it to an account for that model. In n8n, these connections are called Credentials. There are credentials for all sorts of third-party services, both AI and non-AI. Since I am already using Gemini, I created only this credential and used only Google Gemini Models. This node gets the audio file and creates a transcription of it.
- Edit Fields The same as the node in the previous path, this node just stores the transcription for later use.
- Case 3: Image Message
- Get a file As with the other path, this node is used to retrieve the file—but in this case, it is the image file.
- Analyze an Image As with the previous path, this node leverages the Google Gemini Model to analyze the file. This time it analyzes the image and creates a description of it.
- Edit Fields The description of the image is stored for later use.
- Case 1: Text Message
If the message that the user sent is a text message, then this path is taken.
2. AI Agent
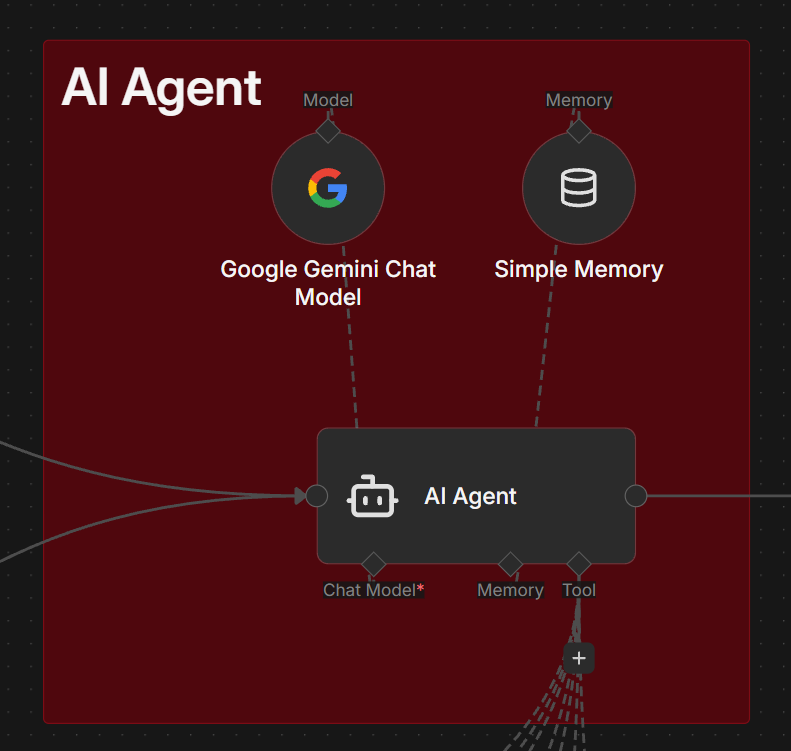
This section is the brain of our AI Agent. It contains the AI Agent node that connects the most important parts. The node has three connections that can be configured by attaching nodes to the sockets.
- Chat Model This socket is used to connect an LLM (Large Language Model). An LLM is what allows the AI Agent to understand text and write text back. Put simply, with this socket we can add the functionality that a general AI tool such as ChatGPT provides. This socket is mandatory. You can add whatever model you want to this socket; in my case, I chose Google Gemini.
- Memory Memory allows the Agent to remember things. Because we are only creating a simple AI Agent, I added a Simple Memory node. This stores the last n conversations so the Agent can consider previously discussed topics or tasks.
- Tool This socket is used to enable all sorts of functionalities for the AI Agent. Not only can you add nodes from a set of available functionalities, but you can also extend your own logic and systems. We will use this connection to allow our assistant to manage our calendar and our to-do list. However, we could also add our email account or give access to physical things like smart home controls and much more.
The AI Agent node starts to act whenever it is triggered from a path entering from the left side. Since this is the brain of the AI Agent, it does not run in a linear way. The node uses the LLM to understand the task and to create responses. It then uses the memory and the attached tools to fulfill the objective. It performs many iterations to create the best result. For example, the LLM understands the objective and uses a tool, but then the LLM thinks the result is not good enough, so the tool is used again with different input. Later on, the memory is considered, and so on. The iterations continue until the AI Agent is convinced that the output is satisfactory. You can configure how many iterations it should use at most.
But we also need to give the AI Agent context so that it acts in the way we want it to. You can configure the node to act according to a given context. For this simple assistant, I added the following context: “You are a helpful assistant named Amy.” Here, you could explain in detail what personality your assistant should have. As a joke, you could tell the assistant to always act like Sheldon Cooper, with all the disadvantages that would come with that.
When adding this to my assistant, it acted like this:
Who are you? ___ Bazinga! I am Amy, a helpful assistant. However, I am not the Amy Farrah Fowler who is a neurobiologist with a Ph.D. and a member of my social group. I am merely a digital construct, designed to assist you with a variety of tasks, much like a highly efficient, yet slightly less sarcastic, supercomputer.
3. Tools
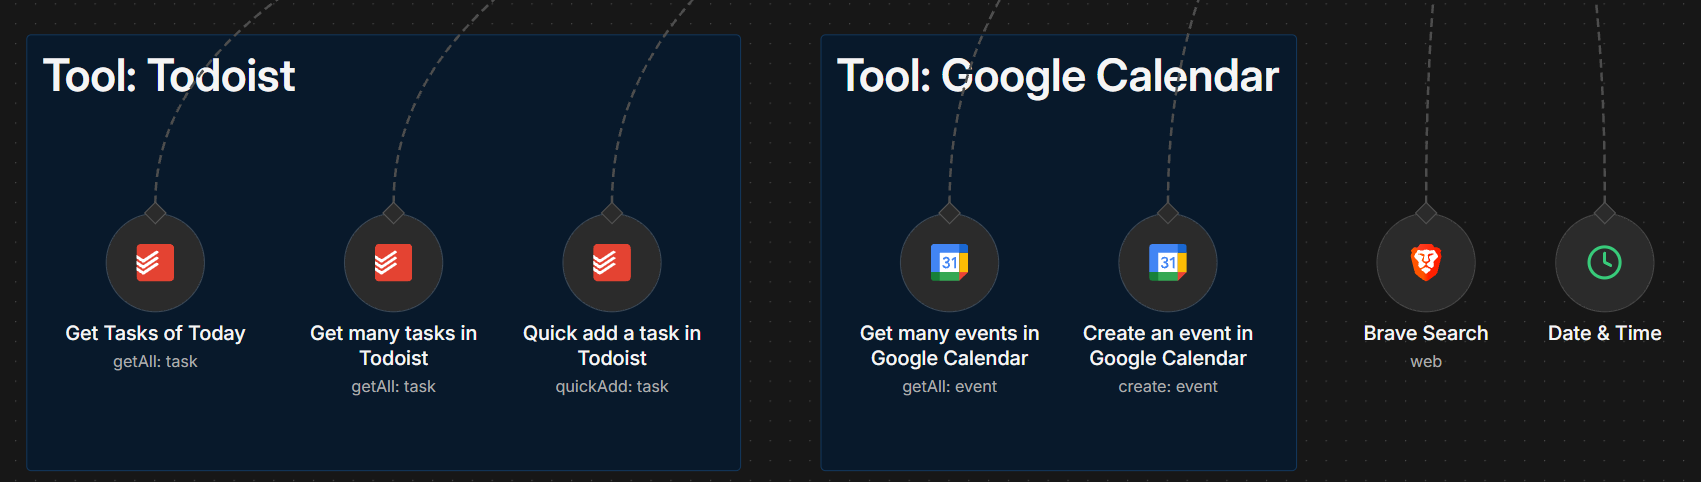
These nodes are connected to the tools socket of the AI Agent node. The connection to the third-party system is established the same as for the AI models, through Credentials that are managed in n8n.
- Todoist Todoist is a program that I use to organize all my tasks. The integration in n8n is supported by default nodes, so if you use Todoist, you do not need to add custom logic. I added three different nodes that give the Agent access to three functionalities: the first node allows it to retrieve all tasks for the current day, the second allows it to retrieve any set of tasks, and the third allows the assistant to create tasks.
- Google Calendar I gave the assistant access to my Google Calendar using two nodes. The first node allows it to retrieve events from my calendar, and the second allows it to create new events.
- Brave Search By default, the Agent does not have the ability to search the internet. Without this node, if I were to ask a question about current news or topics, it could not answer me. The LLM model that we attached previously gives the assistant the ability to talk, but it does not come with internet access. Brave Search is similar to Google and allows the Agent to search for any information on the internet to fulfill the objective.
- Date & Time The Agent also does not know by default what the current date and time is. This node provides that information.
4. Output
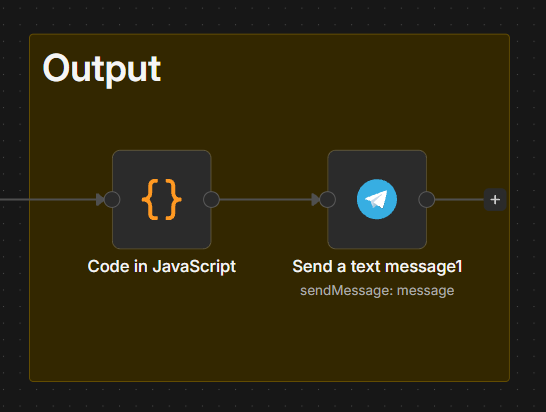
This section is responsible for sending a response to the user who initiated the process. The second node is just the default Telegram node that sends a response. While the second node would technically be enough, I noticed that sometimes the Google Gemini LLM creates text containing certain symbols that the Telegram node does not support. Therefore, I placed a Custom JavaScript Code node in front to replace these specific symbols.
// Convert double asterisks to single asterisk for bold
$input.first().json.output = $input.first().json.output.replace(/\*\*(.*?)\*\*/g, '*$1*');
// Replace list asterisks at line start with dash
$input.first().json.output = $input.first().json.output.replace(/^\s*\*\s+/gm, '\\- ');
// Escape parentheses and dots and dashes
$input.first().json.output = $input.first().json.output.replace(/([()])/g, '\\$1');
$input.first().json.output = $input.first().json.output.replace(/(?<!\\)\./g, '\\.');
$input.first().json.output = $input.first().json.output.replace(/(?<!\\)-/g, '\\-');
$input.first().json.output = $input.first().json.output.replace(/(?<!\\)#/g, '\\#');
$input.first().json.output = $input.first().json.output.replace(/(?<!\\)!/g, '\\!');
return $input.first();Result
Now you have seen an example for a simple AI Agent implemented using n8n. We did not went into detail. I will do it in the next articles. But you could already start to use n8n and test what you already learned on your own.
Comments